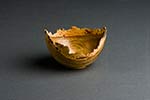
Making of a Hook Tool
As described in the class on Mar 22nd, 2008
 |
HOOK TOOLAlan Lacer 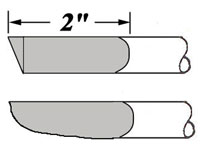
|
 |
RESOURCES FOR MAKING A BASIC HOOK TOOL:
The hook tool is essentially a right-angle gouge that enables
the woodturner doing inside end-grain hollowing to achieve two
goals: work with the grain and use a cutting rather than a
scraping action.
Although there are a variety of tools on the market in many
shapes-ovals, rings, and tools that look like drill bits-the
hook tool is the predecessor of them all.
Follow the steps below to create a simple hook tool from high
carbon steel. Although high-speed steel has longer edge-holding
properties, the heat-treating procedures are beyond most
woodworking shops. Because you will use this tool primarily as a
finishing tool, the edge-holding properties of this carbon steel
works fine.
KEY TERMS:
Annealed: in a softened state.
Tempering:
the process of bringing hardened steel to a softer,
working hardness for a particular use.
PROCESS:
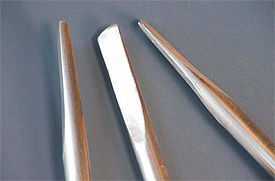
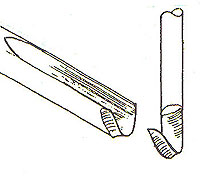
Step 1:
Cut the drill rod with a hacksaw to 9" lengths. Process to
grind one end to the example shown. You can do this with a
wheel grinder, but a belt type grinder is easier and leaves
a better finish. Determine the cutting edge side, but don't
get it sharp at this point. With the cutting edge down, file
the left face to a clean flat face-as this will be the
inside flute of your hook tool.
Grind the blank into this shape. Left: the view from above.
Center: left face (cutting edge down). Right: what will
become the cutting edge.
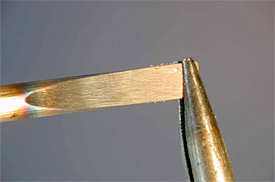
Step 2:
Place the blank in your handle, but don't glue it in just
yet. With your heat source, heat about 1" of the ground end
to a bright cherry red. Using the needle-nose pliers, grab
as near the end as possible and twist to the left to create
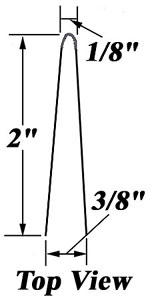
the hook (cutting edge pointing downwards). I like to have a
fairly tight flute on hooks for boxes and goblets. Mine look
a lot like a 1/4" to 3/8" bowl gouge flute.
Grip the bright cherry red end of the blank with the needle
nose pliers and bend into a hook--grip near the end to
produce a smaller hook. If the cutting edge is facing
downward, bend the hook to the left.
Step 3:
If you want a little offset of the hook, heat further back
of the hook (about 3/4"), grab the area just below the hook
and bend this time to the right (cutting edge down).
Step 4:
Next it is time to complete the first step of heat treating
and hardening. Heat only the hook to a bright cherry red. Do
this evenly and gradually, and maintain this temperature for
at least a couple of minutes. If you want to use the
Tempilstick, take the 1450 degree one and either pencil it
on the hook area before you start heating or keep touching
the heated hook until it liquefies. After a couple of
minutes of the bright cherry red, quench quickly into the
can of olive oil, stirring rapidly. After about 1 minute,
remove it from the olive oil and test with a mill file: the
hook area should now be harder than your file. Feel the
difference of filing between the unhardened shaft of the
tool and the hook area.
Step 5:
The second step of heat-treating is to temper. If you have
an accurate oven at home, preheat to 490 degrees, then place
the hook tool on a piece of aluminum foil inside of a
shallow pan or cookie sheet. Bake for about 30 minutes,
remove and just allow to air cool. Or, use the oxidation
spectrum to temper by eye: wash using soap and water to
remove all oil off the tool. Sand or wire brush the entire
hook area until it is clean and bright. Heat with your torch
(propane works well for this step as it is cooler than MAPP)
about 2" below the hook. Watch the colors develop and travel
in both directions from the point you are heating. First
will be a spectrum of yellows, then purple, then a spectrum
of blues. Your goal is to allow the dark end of the
yellows-I call it bronze-to reach the hook section.
Go slow-and when colors approach the hook,
remove from heat source and allow conduction to travel the
temperature. When most of the hook is a bronze color, quench
quickly into water to stop the process. You may also use the
500-degree Tempilstick to better judge the temperature.
After hardening the steel, heat well back of the hook and
allow conduction to bring the bronze color up to the hook
area. When it appears an even bronze quench quickly into
water to halt the process.
Step 6:
Sharpen your hook tool. I sharpen these just like a gouge:
ground bevel outside, smooth flute inside. The angle you
grind on the outside will determine whether you can place
the bevel on the wood without hitting the sides of your
project-same issues as with bowl gouges. A good starting
point is about a 15-degree angle facing away from the
hook-cutting edge facing upward. Be careful with your
grinding, as bluing will soften the edge-so quench in water
frequently.
Honing is essential for this tool to get it truly sharp:
hone the outside and finish by honing the inside flute-use a
slip stone for the honing process. Complete the process by
gluing the tool into your handle with slow-set epoxy. Wait
for 24 hours for the epoxy to set before giving it a try.
There you have it. As simple as the process is-and the steel
is quite reasonable-you can afford to experiment with
different versions to fit the types of projects you are
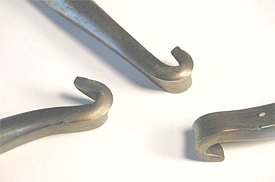
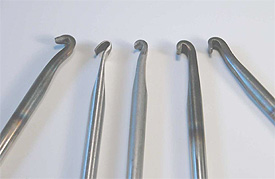
making. Here are several of the key variables: hook shape
and size, degree of offset and the ground bevel angle. For
large projects such as end-grain bowls, go to larger sizes
of drill rod to give greater support.
Experiment with hook shapes, sizes and off-sets. For your
first hook do a simple straight tool with no off-set. Sources:©Copyright 2004 Alan Lacer |
||