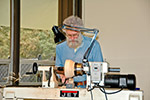
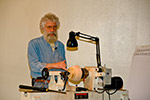
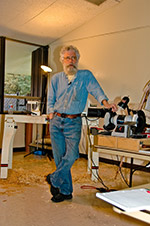
David Ellsworth Demonstration: Mar 15, 2009 - details
Photos: Leroy, and TG.
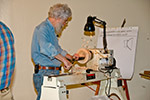
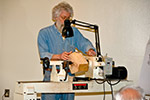
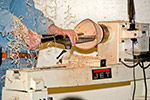
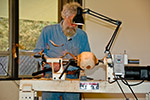
First demo subject - bowl:
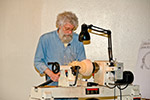
 Taking an odd shaped piece of wood, to demonstrate how this can be done, he
roughed out a tenon for chuck mount and the rough shape of the outer surface, using a
Taking an odd shaped piece of wood, to demonstrate how this can be done, he
roughed out a tenon for chuck mount and the rough shape of the outer surface, using a
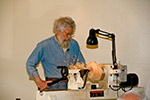
 4 prong
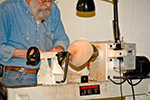
drive center and the tailstock in place. He used primarily what
he called a slice pull cut: handle in back down 45 degrees from level,
firm grip on the tool with the front hand, almost bevel rubbing, cutting
occurring near the tip, not back on the side of the barrel. The
back hand is holding firm near the end of the handle, and firmly against the hip.
He also did a horizontal circle cut to cut the wings that were left at the
top of the bowl. This circle can be done with rocking of the
hips, and removes the wings with the least drama or danger.
4 prong
drive center and the tailstock in place. He used primarily what
he called a slice pull cut: handle in back down 45 degrees from level,
firm grip on the tool with the front hand, almost bevel rubbing, cutting
occurring near the tip, not back on the side of the barrel. The
back hand is holding firm near the end of the handle, and firmly against the hip.
He also did a horizontal circle cut to cut the wings that were left at the
top of the bowl. This circle can be done with rocking of the
hips, and removes the wings with the least drama or danger.
Clearly the design of this piece was evolving as he saw what the uncovered
wood looked like. There is a patience that he displays in
approaching the cutting and design of the wood, that is thoughtful, but also
less work and ultimately safer.
Setting the line of the bottom, he measured the size of the tenon, and
the intersection of the side line with the bottom. This gave him
a measure of how deep the cuts needed to be in the inside.
Remember that he was rough cutting a piece, not for drying, but for t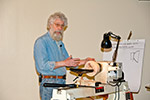 he
finished shape.
he
finished shape.
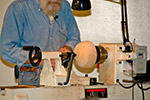
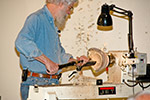
 Rough cut of the
rim, in this case was done with the design choice of a
rounded utility bowl edge, with a little thicker feel at the top of the
bowl, to make it easier to handle. These radius rims on green
bowls do distort better than the sharp edge rim. These cuts were done
with shear cuts. In shear cuts, he positions the toolrest as
close to the surface as possible (Robust toolrest allows for close support)
and the cutting surface at roughly 45degrees, handle against hip, both hands
nearer the wood, and the closer hand applying pressure down on the tool
riding on the toolrest, rather than against the wood. This
results in fine shavings and a clean surface.
Rough cut of the
rim, in this case was done with the design choice of a
rounded utility bowl edge, with a little thicker feel at the top of the
bowl, to make it easier to handle. These radius rims on green
bowls do distort better than the sharp edge rim. These cuts were done
with shear cuts. In shear cuts, he positions the toolrest as
close to the surface as possible (Robust toolrest allows for close support)
and the cutting surface at roughly 45degrees, handle against hip, both hands
nearer the wood, and the closer hand applying pressure down on the tool
riding on the toolrest, rather than against the wood. This
results in fine shavings and a clean surface.
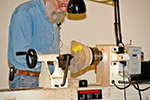
 Chuck tightening: should be done several times on both sides
of the chuck during the turning process, for the piece will change its shape
or compress a bit. He was also tightening the tailstock while
center turning multiple times during the initial rough cuts.
Chuck tightening: should be done several times on both sides
of the chuck during the turning process, for the piece will change its shape
or compress a bit. He was also tightening the tailstock while
center turning multiple times during the initial rough cuts.
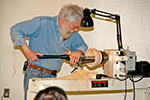
 Using his single bowl gouge, see below for details, he is able to rough
cut using the bevel and the right hand side of the tip. Finish
cuts will be using the left hand side of the tip, about a 1/8 in from the
end of the tip, and with the bevel near vertical. This is
literally a shear cut, and provides a clean surface and good control.
In cutting the inside, he rides the edge to the bottom, and then senses the
edge as he retreats with just the bevel.
Using his single bowl gouge, see below for details, he is able to rough
cut using the bevel and the right hand side of the tip. Finish
cuts will be using the left hand side of the tip, about a 1/8 in from the
end of the tip, and with the bevel near vertical. This is
literally a shear cut, and provides a clean surface and good control.
In cutting the inside, he rides the edge to the bottom, and then senses the
edge as he retreats with just the bevel.
 Sanding when that is performed, is suggested to be done with a soft pad
and Abranet abrasives. He starts with a 220 grit sanding to see how
the surface appears, before going up in grit size or to a finer grit.
Sanding when that is performed, is suggested to be done with a soft pad
and Abranet abrasives. He starts with a 220 grit sanding to see how
the surface appears, before going up in grit size or to a finer grit.
 Running at 150-200 rpm, the initial sanding is performed, followed by
sanding with 320 grit while hand turning the lathe. He then would
progress to 400 grit.
Running at 150-200 rpm, the initial sanding is performed, followed by
sanding with 320 grit while hand turning the lathe. He then would
progress to 400 grit.
To finish the back or underside of the bowl, he u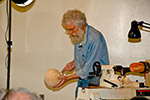 sed a jam chuck
approach. Novel idea was to use 100 rpm to feather the previous
cut side surface to the bottom cut surface, since they are inherently cut on
slightly different centers. He uses the low speed cut in the
shear scrape mode to match the two surfaces sufficiently to make it appear
the same.
sed a jam chuck
approach. Novel idea was to use 100 rpm to feather the previous
cut side surface to the bottom cut surface, since they are inherently cut on
slightly different centers. He uses the low speed cut in the
shear scrape mode to match the two surfaces sufficiently to make it appear
the same.
Natural Edge:
 Rough the outside as above, using a 4pt drive center for safety,
if needed. Then cut the tenon for mounting in the chuck . Mount in the chuck
and begin the outside cuts, using a slice cut from top to bottom.
He used a left-handed style at this point, so your eyes can see where to
cut. Use a shear cut going downhill towards the bottom for
the finish cuts.
Complete the outside.
Rough the outside as above, using a 4pt drive center for safety,
if needed. Then cut the tenon for mounting in the chuck . Mount in the chuck
and begin the outside cuts, using a slice cut from top to bottom.
He used a left-handed style at this point, so your eyes can see where to
cut. Use a shear cut going downhill towards the bottom for
the finish cuts.
Complete the outside.
Inside: rough out as with the bowl above, looking at the outside of the bowl while cutting, to have a good sense of the shape needed on the inside. Test while stopped: look away and feel with your fingers.
Using the jam chuck, complete the bottom as before.
One tip regarding CA glue: fumes can raise the heart rate and have other bad side effects.
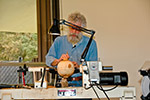
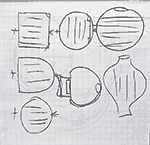
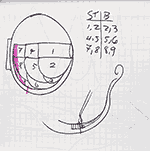
Hollow Form:
With a log set between centers, with bark, turn until a cylinder, with
the grain running
 parallel between centers. Rough the side
near tailstock to a round shape. See diagram. This
allows a entire log to be used for this form, not just one half of the log.
parallel between centers. Rough the side
near tailstock to a round shape. See diagram. This
allows a entire log to be used for this form, not just one half of the log.
Switch 180 degrees and cut the other end to make a near sphere.
 Now
becomes the point at which you determine the top and
bottom of the final
piece. It can be a result of seeing wood features you want to
display on top or perhaps avoid by putting them on the bottom.
Mark the
Now
becomes the point at which you determine the top and
bottom of the final
piece. It can be a result of seeing wood features you want to
display on top or perhaps avoid by putting them on the bottom.
Mark the
 rough center of the sphere by holding a pencil on the toolrest and
hand turning the piece.
rough center of the sphere by holding a pencil on the toolrest and
hand turning the piece.
Now reposition the piece using the pencil marks, with the event bottom,
where the tenon will be cut, near the tailstock. Now cut off the
spigot left behind, using a slice cut and a circular motion. This is
the more safe approach. Mark the pith on both sides.
Cut off any wood marks or aberrations you do not want in the final piece.
Now cut the tenon.
bottom,
where the tenon will be cut, near the tailstock. Now cut off the
spigot left behind, using a slice cut and a circular motion. This is
the more safe approach. Mark the pith on both sides.
Cut off any wood marks or aberrations you do not want in the final piece.
Now cut the tenon.
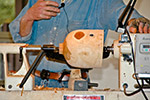
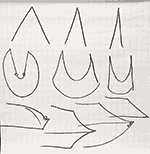
 Mounting the piece in the chuck, proceed to begin the hollow cutting.
He
Mounting the piece in the chuck, proceed to begin the hollow cutting.
He
 used his Ellsworth hollowing tools, available on his website and from
Craft Supplies. See the list of suggested items.
used his Ellsworth hollowing tools, available on his website and from
Craft Supplies. See the list of suggested items. 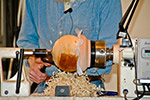 He
progressed through the cuts as shown, using the straight cutter as much as
he could, as per the table.
He
progressed through the cuts as shown, using the straight cutter as much as
he could, as per the table.
He then used a bowl as a jam chuck and proceeded to finish the bottom as above.
Sharpening:
 He uses 120 grit wheels (MSC wheels which are not that expensive, but are
hard) for
the fine cuts, and an 80grit wheel for reshaping a tool.
He uses 120 grit wheels (MSC wheels which are not that expensive, but are
hard) for
the fine cuts, and an 80grit wheel for reshaping a tool.
His bowl gouge has a 60-70degree leading edge angle with a
 parabolic
profile, and a broader thickness on the wings than most gouges I have seen.
His logic is simple, having more support for the edge with the wider wings,
as shown at left, provides a more stable cutting edge to the wood. This perhaps is not as sharp
as the narrow wing edge, but it is better behaving and less apt to dig or
tear. These parabolic profile gouges are now widely available.
His custom jig provides the correct angles on the sharpened tool, which can
also be achieved with other tool jigs, but not in the standard setup.
parabolic
profile, and a broader thickness on the wings than most gouges I have seen.
His logic is simple, having more support for the edge with the wider wings,
as shown at left, provides a more stable cutting edge to the wood. This perhaps is not as sharp
as the narrow wing edge, but it is better behaving and less apt to dig or
tear. These parabolic profile gouges are now widely available.
His custom jig provides the correct angles on the sharpened tool, which can
also be achieved with other tool jigs, but not in the standard setup.
Hollow tools are set at 80 degrees, have a 10% cobalt tip, such as from Enco. The straight tool is 1/4in while the bent cutting tip is 3/16in. Tips are glued in with CA, and removed with a propane torch.
We thank David for a most informative demonstration.