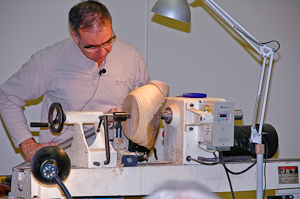
Chris Pytlik gave a demonstration on Mar 13th, 2011
 Report
from George Lutz and pics from LeRoy below:
Report
from George Lutz and pics from LeRoy below:
Also Laura's report below and in PDF form here.
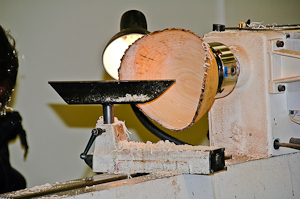
MORNING - TURNING
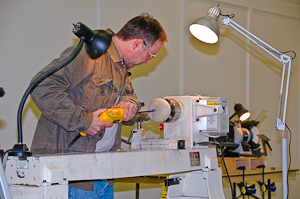 1.
Woods used: Silver Maple, Cottonwood, Poplar 2. When forming tendons,
check fit before taking it off the lathe.
1.
Woods used: Silver Maple, Cottonwood, Poplar 2. When forming tendons,
check fit before taking it off the lathe.
3. Normal Bowl cut UP HILL.
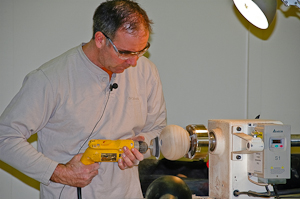 4.
1st get general shape then use shear cuts to get clean cuts.
4.
1st get general shape then use shear cuts to get clean cuts.
5. If you can't get torn grain out while shear scrapping then go to a bevel rubbing cut with small gouge.
6. Try UP Hill cut or Down Hill cut to get rid of torn grain.
Sometimes one works better than the other.
 7.
Try to not to leave ANY torn grain - it's very hard to sand out.
7.
Try to not to leave ANY torn grain - it's very hard to sand out.
8. To get a smooth cut inside a lip, use continuous motion cut. Don't start/stop as you'll get ridges.
9. Sand to 320 only so you don't risk burnishing the fiber ends. If you burnish then you won't get dye flow from inside/out.
 AFTERNOON
- DYING HOLLOW FORM
AFTERNOON
- DYING HOLLOW FORM
1. Use 2-part bleach before dying. If you don't, you'll get the color of the wood, usually yellow, blending with the dye.
2. Use Trans Tint dyes 2oz tubes available from Woodcraft. (Metal Acid dyes) 3. Uses Acetone to thin dyes. This prevents cracking from rapid drying of alcohol.
4. You only need yellow/blue/red dyes to get going 5. Squirt dye into inside of bowl with pipette and observe bleed through to outside. Be careful as more bleed through causes darker color.
6. Always start light then add dye to get darker.
7. Use a concentrated mix and go around the rim with brush.
8. Drip contrasting color on outside onto places with no bleed through.
9. To prevent bleed through, use sealer on that area. For example if you want a decoration or name on the outside.
10. Uses NITRO lacquer - High Build lacquer. 10 coats in HVLP gun.
Uses Gravity feed gun
11. Match lacquer thinner to lacquer - same brand.
12. High Gloss Deft may work but not recommended as high speed buffing with scratch it.
 AFTERNOON - DYING NATURAL EDGE
1. Use concentrated dye around the bark. Drips are OK.
2. Bleed through from inside.
3. Do outside the same as above.
4. Dry overnight or 1 hour in front of a fan with a heat gun.
FINISH
1. Sanding sealer compatible to lacquer used 2. Five coats of finish ( 3/day) 3. Only sand between coats if you have dust or run marks in the finish.
4. Use car Bondo after 2nd coat to fill voids. Tint if needed.
5. Use finger nail polish to fill dings or small voids until the surface is flat.
6. Sand with 320 with vacuum on or by hand. Recommends 150 rpm, dry sand, keep sanding until no bright spots.
7. Five more coats of lacquer to fill 320 sanding marks.
8. 600 grit wet sand with water + 2 drops of dishwashing detergent..
9. Dry off and check for bright spots, drips, runs, etc. Hand sand to remove, use random sanding stroke to break up scratch pattern 10. On hot days, use a reducer to increase drying times.
11. Wait 10 days before buffing.
12. Don't use Tripole / white diamond. These are made for automobile finishes and won't work with high build up lacquer. Stewmac.com for buffing wheels and compounds. Only uses two compounds, a coarse and fine.
NOTE: I contacted Stewmac and asked them to design a mandrel for use on a lathe. They are discussing doing so. Chris said it's taking him a long time to adapt the Stewmac wheels to his lathe and he is still getting slippage on the wheels. G Lutz
Laura Uden's Report: Hollowing and Bleaching:
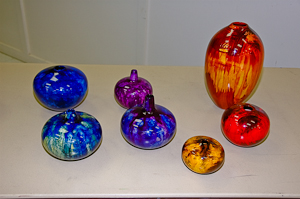
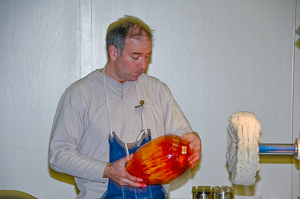 Chris spent the morning creating a hollow form and a natural edge bowl,
and the afternoon explaining and demonstrating his coloring techniques.
Chris spent the morning creating a hollow form and a natural edge bowl,
and the afternoon explaining and demonstrating his coloring techniques.
It’s important to select wood that is fairly open-grained and porous, and also light-colored wood. Poplar, liquidambar, birch, alder are some that will work well.
Chris uses Hood Finishes two-part bleach to lighten the pieces prior to adding color, as otherwise, the colors will be modified by the wood color.
For example, red dye added to a tan piece of wood turns a brownish color. He only bleaches the outside of the piece, as the inside of a hollow form doesn’t show.
This bleach is similar to the Hood bleaches Chris uses, but it can be obtained locally and may therefore be cheaper, since I've heard the shipping on the Hood finishes is quite high. Two other brands marketing these types of bleaches are listed below - they may be available in local hardware stores or at Woodcraft: Other 2-part wood bleaches:
- Wood Kote Lite-N-Up
- Kleen Strip
- Zinsser
Whatever brand you use, be very careful as it's extremely caustic.
Coloring:
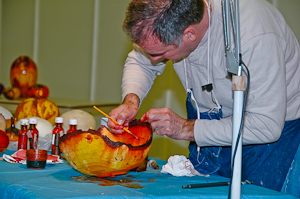 He uses TransTint dyes from Woodcraft, but he said that aniline dyes are
also good, as is Sherwin Williams dye stain concentrate (sure fast dye).
He uses TransTint dyes from Woodcraft, but he said that aniline dyes are
also good, as is Sherwin Williams dye stain concentrate (sure fast dye).
It’s important to get something that is colorfast. Chris explained the difference between dyes and pigments: pigments sit on top of the wood, while dyes penetrate, because they have smaller molecules.
The dyes need to be thinned with something, as they are concentrated. Chris used to thin the dye with denatured alcohol, but found the pieces would often crack, as the alcohol has a high water content. He has now switched to thinning the dyes with acetone.
Chris just estimates the right amount of dye to get the color he wants, then he checks it by dropping a bit on a white paper towel.
Chris applies the dye with pipettes from the inside – he squirts it around the inside of the piece and it bleeds through to the outside. The dye will bleed through much better on the end grain, as it’s like sending the dye through open straws.
To get the dye on the side grain, you can drip it down the outside of the piece using a small brush, as it won’t come through from the inside. Chris puts several daubs of dye near the top opening of the piece, and lets it run down.
For natural edge bowls, he uses a brush to paint concentrated darker color on the bark, then squirts a lighter color on the inside and outside near the bark, so some of that color runs down into the piece.
Finishing:
The pieces need to overnight, or one hour with a fan on them. Chris then uses sanding sealer to seal the end grain, then up to ten coats of lacquer finish, sanding with 320 after 5 coats.
He uses nitrogenous lacquer, thinned with a reducer, but any good lacquer and its recommended thinner will do. He applies it with a gravity-fed Finex spray gun.
Each coat needs to dry for a couple of hours, so he does about 3 coats per day.
After the last coat, he lets it stand overnight, then wet sands with 600 grit sandpaper, then lets it cure for 5 days. The final step is to buff it with Menzerna compounds for plastic (coarse and fine) which he gets from www.stewmac.com.